
Can you turn on a Lenovo Yoga laptop with the lid closed? Generally, you cannot initiate the power-up sequence with the lid fully closed unless a specific setting or feature is enabled beforehand, like Wake-on-LAN or certain BIOS configurations. For most Yoga laptops, opening the lid is a necessary step to access the power button and begin the Yoga laptop startup process.
Turning on your Lenovo Yoga laptop is usually a straightforward process. Many users, especially those new to the Yoga line or laptops in general, might wonder about the specific location of the Lenovo Yoga power button and the correct way to activate their device. This guide will walk you through the simple steps to get your Yoga notebook on switch working smoothly and ensure your Yoga computer boot up without any hitches. We’ll also cover what to do if you encounter common issues, such as a Yoga laptop not powering on or a Yoga laptop won’t start.
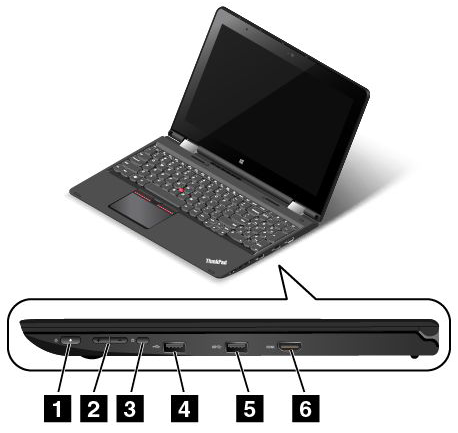
Image Source: download.lenovo.com
Locating the Power Button
The first step in turning on your Yoga laptop is finding the power button. Lenovo has placed the power button in different locations across its Yoga models over the years, but there are common spots to check.
Common Power Button Placements
- On the Keyboard Deck: For many older or standard Yoga models, the power button is integrated into the keyboard deck. It’s often located in the top-right corner of the keyboard, similar to where the Delete key might be, or sometimes slightly above and to the right of the keyboard. It might be a dedicated button with a power symbol (a circle with a vertical line through the top half).
- On the Side of the Laptop: Newer and sleeker Yoga models, particularly the ultra-thin ones like the Turn on Yoga ultrabook series, often feature the power button on the side edge of the chassis. You might find it on the left or right side, usually towards the top or near the hinge. It’s often a slim, rectangular button.
- Integrated into the Hinge: Some innovative Yoga designs have incorporated the power button into the hinge mechanism itself. This offers a clean, button-less look on the keyboard deck. The button might be subtly placed on the spine of the laptop where the screen meets the keyboard.
Tip: Look for a small button with the universal power symbol (⏻). If you can’t find it immediately, check the edges of your laptop, the area around the keyboard, and even the hinge itself.
The Basic Power-On Procedure
Once you’ve located the power button, turning on your Yoga laptop is as simple as pressing it.
Step-by-Step Activation
- Open the Laptop Lid: If your laptop is closed, gently open it to its working position. This often activates the screen and makes the power button more accessible.
- Locate the Power Button: Refer to the section above to find its exact position on your specific Yoga model.
- Press the Power Button: Give the power button a firm but gentle press. You don’t need to hold it down for an extended period. A short, decisive press is usually sufficient.
- Observe for Signs of Life: You should hear the fan spin up, see lights illuminate on the chassis, and most importantly, observe the Yoga laptop screen black issue being resolved as the display comes to life.
What Happens During Yoga Laptop Startup
When you press the power button, your Yoga laptop initiates a complex sequence to get everything ready for you to use. This process is known as Yoga computer boot up.
The Boot-Up Sequence
- Power On Self-Test (POST): The laptop’s hardware components are checked to ensure they are functioning correctly.
- BIOS/UEFI Initialization: The basic input/output system (BIOS) or Unified Extensible Firmware Interface (UEFI) loads essential firmware and controls.
- Operating System Loading: The operating system (usually Windows) begins to load from the storage drive.
- Driver Initialization: Necessary drivers for hardware components like the display, keyboard, and Wi-Fi are loaded.
- Login Screen/Desktop: Finally, you’ll be presented with the login screen or your desktop, ready for use.
Note: The time it takes for your Yoga laptop startup can vary depending on the model, its age, and what software is configured to run at startup.
Ensuring Your Yoga Laptop is Ready to Power On
Before you attempt to turn on your Yoga laptop, there are a few preliminary checks that can save you troubleshooting time if the device is unresponsive.
Pre-Power-On Checks
- Check the Battery Level: If your laptop hasn’t been used in a while or you suspect a battery issue, ensure it has sufficient charge.
- Yoga laptop charging indicator: Look for an LED light, usually near the charging port or on the side of the laptop. This light often indicates whether the laptop is charging, fully charged, or has no power.
- Solid Amber/Orange: Charging.
- Solid White/Green: Fully charged.
- No Light: Battery is empty or not connected properly, or the laptop is off and not charging.
- Yoga laptop charging indicator: Look for an LED light, usually near the charging port or on the side of the laptop. This light often indicates whether the laptop is charging, fully charged, or has no power.
- Connect the AC Adapter: If the battery is low or you’re unsure, plug in the AC adapter. Even if the battery is completely drained, connecting the charger might provide enough immediate power to turn on the device and allow the battery to gain some charge. Wait a few minutes after plugging it in before trying to power on.
- Verify the Power Outlet: Ensure the power outlet you’re using is working by testing it with another device. Also, check that the AC adapter is securely plugged into both the laptop and the wall socket.
Troubleshooting Common Power Issues
It’s frustrating when your Yoga laptop won’t start or the Yoga laptop not powering on. Here are some common solutions and checks you can perform.
When the Laptop Doesn’t Respond
If you press the Lenovo Yoga power button and nothing happens – no lights, no fan noise, no screen activity – try these steps:
Power Cycle the Laptop
A power cycle can resolve minor electrical glitches.
- Disconnect Power: Unplug the AC adapter from the laptop. If your Yoga has a removable battery (rare on modern models), remove it.
- Press and Hold the Power Button: Press and hold the power button for about 15-30 seconds. This drains any residual power.
- Reconnect Power: Plug the AC adapter back into the laptop. If you removed the battery, reinsert it.
- Attempt to Power On: Press the power button normally.
Check the AC Adapter and Battery
- Inspect the AC Adapter: Ensure the adapter’s cable is not damaged or frayed. Try a different compatible AC adapter if you have one available to rule out adapter failure.
- Battery Health: If your laptop has been on for a while and then suddenly won’t turn on, the battery might be completely depleted or faulty. Leave it plugged in for at least 30 minutes to an hour before trying again.
Examine the Display
Sometimes, the laptop is powering on, but the display isn’t showing anything. This leads to the Yoga laptop screen black issue.
- Listen for Sounds: When you press the power button, listen for fan noise, hard drive activity, or startup sounds. If you hear these, the laptop is likely powering on.
- Check Backlight: In a dimly lit room, look closely at the screen. You might be able to faintly see an image or the Lenovo logo if the backlight is off but the display is still working.
- External Monitor Test: Connect your Yoga laptop to an external monitor or TV using an HDMI or USB-C cable. If the external display works, the issue is likely with your laptop’s built-in screen or its connection. You may need to press a function key combination (often Fn + F4, F5, F7, or F8, look for a screen icon) to toggle between displays.
When the Laptop Powers On But Doesn’t Boot
If you see lights, hear fans, but the screen remains black or shows an error message, the problem might be with the boot process.
Safe Mode
Booting into Safe Mode can help diagnose issues caused by third-party software or drivers.
- Force Shutdown: Press and hold the power button until the laptop completely shuts off.
- Repeat Startup: Turn the laptop on and off three times in a row. This should trigger the Windows Recovery Environment.
- Navigate to Safe Mode: In the Recovery Environment, go to Troubleshoot > Advanced options > Startup Settings > Restart. After the restart, press the number key corresponding to “Enable Safe Mode” (usually 4 or 5).
- Check Devices: If you can access Safe Mode, it suggests a driver or software conflict. You can try uninstalling recently installed programs or updating/rolling back drivers from Device Manager.
BIOS/UEFI Settings
Incorrect BIOS/UEFI settings can sometimes prevent a Yoga computer boot up.
- Accessing BIOS/UEFI: Immediately after pressing the power button, repeatedly press the F1, F2, F10, F12, or DEL key, or the Novo button (a small recessed button usually found on the side or near the power button on some Lenovo models). The exact key depends on your Yoga model, and it will usually be displayed briefly on the screen during startup.
- Reset to Defaults: In the BIOS/UEFI menu, look for an option like “Load Default Settings,” “Restore Defaults,” or “Optimized Defaults.” Select this option, save the changes (usually by pressing F10), and exit. This can often resolve boot issues caused by misconfigurations.
Initial Setup and First Use
Once your Yoga laptop successfully powers on, you’ll likely go through an initial setup process, especially if it’s a new device.
The Yoga Laptop Initial Setup
- Welcome Screen: Follow the on-screen prompts from Windows or your operating system.
- Region and Keyboard Layout: Select your preferred region and keyboard language.
- Network Connection: Connect to your Wi-Fi network.
- Microsoft Account: Sign in with your Microsoft account or create a new one. This links your settings and allows for cloud syncing.
- Privacy Settings: Review and adjust privacy settings according to your preferences.
- Cortana and Other Features: Configure personal assistants like Cortana and other Windows features.
- Updates: Ensure your laptop downloads and installs any pending Windows updates and driver updates. This is crucial for stability and security.
Tip: Have your Wi-Fi password ready and be prepared to sign in with your Microsoft account for a smoother Yoga laptop initial setup.
Advanced Usage: Turning On Without Lifting the Lid
While the standard method involves opening the lid, some advanced users might want to know if it’s possible to turn on their Turn on Yoga ultrabook without opening it.
Wake-on-LAN and Other Features
- Wake-on-LAN (WoL): This feature allows you to remotely turn on your computer over a network connection. It requires configuration within the BIOS/UEFI and the network adapter settings in Windows. This is generally not used for simply turning on your laptop from a completely off state but rather for waking it from sleep or hibernation remotely.
- Always-On USB Ports: Some laptops have USB ports that remain powered even when the laptop is off or in sleep mode. While this doesn’t directly turn on the laptop, it can be used to power external devices.
- Specific BIOS Settings: In rare cases, some BIOS settings might allow for power-on via a USB keyboard or mouse, or even at scheduled times. However, these usually require the lid to be open or the laptop to be in a specific standby state, not a full shutdown.
For most users, the most reliable way to turn on their Yoga laptop is by pressing the physical power button after opening the lid.
Maintaining Your Yoga Laptop
To ensure your Yoga laptop continues to power on reliably, consider these maintenance tips:
Regular Care
- Keep it Clean: Dust can accumulate in vents and on the keyboard, potentially affecting internal components. Use compressed air to clean the vents and a soft cloth for the keyboard and screen.
- Software Updates: Regularly install operating system and driver updates. These often include performance improvements and bug fixes that can prevent startup issues.
- Battery Management: Avoid constantly draining the battery to 0% and charging it to 100%. Many laptops have battery health management features that can optimize charging.
- Proper Shutdown: Always shut down your laptop properly through the operating system’s shutdown command. Forcefully shutting it down by holding the power button should only be done when the system is unresponsive.
Frequently Asked Questions (FAQ)
Here are answers to some common questions about turning on a Lenovo Yoga laptop.
Q1: My Yoga laptop won’t turn on. What should I do?
A1: First, ensure the laptop is plugged in and the Yoga laptop charging indicator shows it’s receiving power. Try a power cycle by unplugging the AC adapter, holding the power button for 15-30 seconds, then plugging it back in and trying to power on. Check if the AC adapter is working with another compatible device.
Q2: What is the Lenovo Yoga power button typically like?
A2: It’s usually a small button with the universal power symbol (⏻). It can be located on the keyboard deck, the side edge of the laptop, or sometimes integrated into the hinge.
Q3: The screen on my Yoga laptop is black after I press the power button. What’s wrong?
A3: This is the Yoga laptop screen black issue. The laptop may be powering on but not displaying anything. Listen for fan noises or startup sounds. Try connecting to an external monitor to see if the display output is working. The screen itself or its connection might be the problem.
Q4: How long should I leave my Yoga laptop plugged in if the battery is completely dead before trying to turn it on?
A4: It’s advisable to leave it plugged in for at least 30 minutes to an hour to allow the battery to gain a minimal charge. Then, try to power it on while still connected to the AC adapter.
Q5: Can I turn on my Turn on Yoga ultrabook without opening the lid?
A5: Generally, no, unless specific advanced features like Wake-on-LAN are configured and the laptop is in a compatible sleep or hibernation state. For a full shutdown, opening the lid to access the power button is the standard method.
Q6: What’s the difference between turning on and booting up?
A6: Turning on refers to supplying power to the laptop and activating its hardware. Yoga computer boot up is the subsequent process where the operating system loads and prepares the laptop for use.
Q7: My Yoga laptop initial setup is stuck. What should I do?
A7: If the Yoga laptop initial setup is frozen, try performing a hard shutdown by holding the power button until the device turns off. Then, restart it and try the setup process again. Ensure you have a stable internet connection if it’s required during setup.
By following these simple steps and troubleshooting tips, you should be able to successfully turn on your Lenovo Yoga laptop and get it ready for use.